
Can you wrap a cat for nail trimming? Yes, wrapping a cat can be a very effective method to safely trim their nails, especially for cats who are nervous or resistant to paw handling. This blog post will delve into the “how-to” of wrapping your feline friend, exploring various techniques, why it’s important, and how to make the experience as stress-free as possible for both of you. We’ll cover everything from basic cat handling to advanced cat grooming practices.
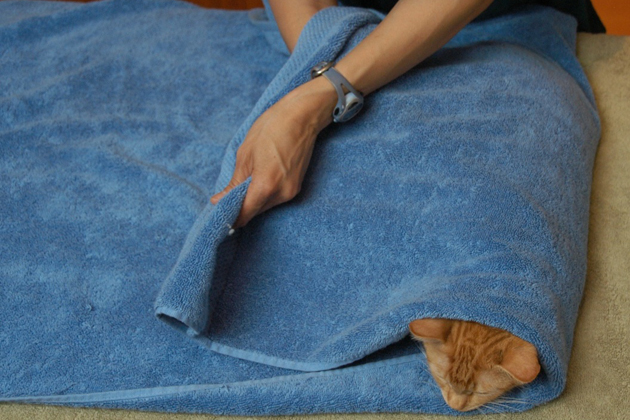
Image Source: cdn-images.vetstreet.com
Why Nail Trimming Matters for Your Cat
Regular nail trimming is a vital part of overall cat grooming. Overgrown nails can cause a variety of problems for your cat. They can curl inward, digging into the paw pads, leading to pain, infection, and even lameness. For cats that don’t scratch regularly on appropriate surfaces, their nails can become excessively long and sharp, catching on furniture, carpets, and even skin. This can cause torn nails, discomfort, and a greater likelihood of getting stuck. Beyond the physical discomfort, long nails can also affect a cat’s gait and posture. Therefore, learning proper cat handling techniques, including how to manage nail trims, is essential for a cat’s well-being.
Preparing for a Stress-Free Nail Trim
Success in cat nail clipping often hinges on preparation and a calm demeanor. Before you even think about wrapping your cat, gather all your supplies.
Essential Supplies for Nail Trimming
- Cat Nail Clippers: Choose clippers specifically designed for cats. They come in various styles, such as guillotine or scissor-type. Ensure they are sharp; dull clippers can crush the nail, causing pain.
- Styptic Powder (or Cornstarch): This is a must-have. Inevitably, you might accidentally cut too short and hit the quick (the pink part of the nail containing blood vessels and nerves). Styptic powder will stop the bleeding quickly.
- Treats: High-value treats are crucial for positive reinforcement cat training. Think small, delicious morsels your cat loves.
- Towels or Blankets: These will be used for the wrapping process.
- A Helper (Optional but Recommended): Having another person can make the process much smoother, especially for a wiggly cat.
Creating a Positive Environment
The environment plays a huge role in cat calming. Choose a quiet room with minimal distractions. Turn off loud appliances and ensure other pets or children won’t interrupt.
- Familiarity: If possible, conduct nail trims in a place your cat associates with positive experiences, like their favorite lounging spot.
- Timing: Pick a time when your cat is naturally relaxed, perhaps after a meal or a play session. Avoid times when they are agitated or stressed.
Desensitizing Your Cat to Paw Handling
One of the biggest hurdles in nail trimming is a cat’s aversion to having their paws touched. Desensitizing cats to cat paw handling is a gradual process that builds trust and reduces anxiety. This is where positive reinforcement cat methods shine.
Step-by-Step Desensitization Process
- Gentle Touch: Start by simply petting your cat, including their legs. When they are relaxed, gently touch one of their paws. If they tolerate it, immediately offer a treat and praise.
- Paw Massage: Progress to gently massaging their paws. Continue offering treats and praise as you do this.
- Toe Spreading: Once your cat is comfortable with paw massages, gently spread their toes, exposing the nails. Again, reward this with treats and affection.
- Introducing Clippers: Let your cat see and sniff the nail clippers. You can even gently tap the clippers near their paws (without touching them) while offering treats. The goal is for them to associate the clippers with good things.
- Clicker Training (Optional): If you use clicker training, you can click and treat every time your cat shows a positive reaction to your touch, paw handling, or the sight of the clippers.
This process can take days or even weeks, depending on your cat’s temperament. Patience is key. Never force your cat; this will only increase their fear and resistance.
The Towel Wrap Method: Your Go-To Cat Restraint
The towel wrap, often referred to as the “kitty burrito,” is a popular and effective cat restraint technique for nail trimming. It provides a sense of security for the cat while preventing them from scratching or kicking.
How to Wrap Your Cat: A Detailed Guide
- Lay Out the Towel: Spread a towel flat on a surface. A medium-sized, somewhat flexible towel works best.
- Place Your Cat: Gently place your cat on the towel, facing away from you. You can either have their head towards one end of the towel or in the middle, depending on what feels more secure for your cat.
- First Fold: Bring one side of the towel over your cat’s back, tucking it snugly under their belly. This should secure one side of their body and front legs.
- Second Fold: Bring the other side of the towel over your cat’s back, tucking it firmly under their belly. The goal is to create a snug, secure wrap that immobilizes their body but doesn’t constrict their breathing.
- The Head and Paws: You should have a portion of the towel remaining near your cat’s head. You can either leave their head exposed, allowing them to see you and potentially be reassured, or gently fold the remaining towel over their head, leaving their face exposed. This often helps with cat calming. The key is to ensure their paws are accessible for trimming. Often, one paw will naturally be sticking out, or you can gently ease one paw out from the wrap.
Table: Towel Wrap Variations
| Wrap Style | Description | Best For |
|---|---|---|
| Full Burrito | Cat is completely wrapped, leaving only the head exposed. | Highly resistant cats, or when needing to trim all four paws and tail nails. |
| Partial Wrap | Cat is wrapped from the shoulders back, leaving the front legs and head accessible. | Cats who are okay with front paw handling but not hind paw handling. |
| Head Out Wrap | Cat is wrapped around the body, but the head is completely free. | Cats who are easily panicked by having their head covered. |
| Paw-Specific Wrap | A smaller towel or blanket used to wrap only one limb at a time, exposing just the paw to be trimmed. | Cats who are only difficult with one specific paw. |
Trimming the Nails While Wrapped
Once your cat is securely wrapped:
- Access a Paw: Gently ease one paw out from the towel wrap. If it doesn’t come out naturally, carefully adjust the towel to expose just one paw.
- Hold the Paw: Cradle the paw in your hand, gently pressing the pad to extend the nail.
- Trim: Clip only the tip of the nail, avoiding the pink quick. It’s better to trim small amounts frequently than to risk cutting the quick.
- Reward: Immediately after trimming each nail, or after a few nails, offer a treat and praise.
- Switch Paws: Carefully adjust the towel to access the next paw.
- Patience: If your cat becomes too distressed, stop. You can always try again later or break the session into smaller parts. It’s better to trim a few nails today and a few tomorrow than to traumatize your cat.
Alternative Cat Handling Techniques
While the towel wrap is effective, other cat handling methods can also be useful, especially if your cat tolerates some degree of restraint.
The Scruff and Support Method
This method involves gently scruffing your cat and providing support to their hindquarters.
- Gentle Scruff: With your cat in your lap or on a stable surface, gently grasp the loose skin at the back of their neck (the scruff) with one hand. Most cats will relax their hindquarters when scruffed.
- Support: Use your other hand to support your cat’s body, particularly their hindquarters, to prevent them from squirming or arching their back.
- Paw Access: Gently extend one paw for trimming.
This method is best for cats who are generally compliant or for quick trims. It requires a firm but gentle grip.
The Lap Wrap
This is a less restrictive method that relies on your body to help secure the cat.
- Sit Comfortably: Sit in a chair with your cat on your lap, facing away from you.
- Wrap Your Arms: Wrap one arm around your cat’s body, using your forearm to gently secure their front legs and torso against your chest.
- Expose the Paw: Gently take one paw and hold it to trim.
- Reward: Use your free hand to offer treats.
This method is good for cats who are mildly resistant but not overly fearful.
The Role of Cat Calming Aids and Products
Sometimes, despite your best efforts, your cat might still be too stressed for a nail trim. There are several cat calming aids that can help.
Natural Calming Solutions
- Feliway Diffusers/Sprays: These products release synthetic feline facial pheromones that mimic the calming signals cats emit. They can be plugged in or sprayed in the environment.
- Herbal Supplements: Calming supplements containing ingredients like L-theanine or chamomile can be given to cats. Always consult your veterinarian before administering any supplements.
- Catnip (for some cats): While catnip makes some cats mellow, it can make others hyper. It’s worth a try to see your cat’s reaction.
Specialized Products
- Cat Muzzle: A cat muzzle is a last resort and should be used with extreme caution and never without proper introduction and training. It covers the cat’s mouth to prevent biting. It’s crucial that the muzzle allows for panting and drinking. A cat muzzle is typically not for nail trimming directly but for preventing bites during grooming if the cat is exceptionally agitated.
- Cat Bib: A cat bib is a fabric covering that goes over the cat’s head, leaving only their face exposed. Similar to a muzzle, its purpose is to prevent biting and scratching, and it requires careful introduction. Some bibs have ear covers as well.
Important Note: Never use a cat muzzle or cat bib as a substitute for proper cat handling or desensitizing cats. These are tools to be used cautiously and for specific situations, always prioritizing the cat’s comfort and safety. They should not be used if they cause extreme distress.
Troubleshooting Common Nail Trimming Challenges
Even with the best preparation, you might encounter difficulties.
What to Do If Your Cat Hisses, Swats, or Bites
- Stop Immediately: If your cat shows signs of aggression, release them and stop the session. Forcing them will only make the situation worse.
- Re-evaluate: Consider if your cat is truly ready. Have you desensitized them enough? Is the environment calm?
- Try Again Later: Sometimes, a short break and attempting the trim later in a more relaxed state can work.
- Consult a Professional: If your cat remains consistently aggressive, seek advice from a veterinarian or a professional groomer who specializes in difficult cats. They can offer personalized advice or perform the grooming for you.
Accidental Quicking
- Stay Calm: Panicking will upset your cat further.
- Apply Styptic Powder: Dip the bleeding nail into styptic powder or cornstarch. Apply gentle pressure for a minute.
- Don’t Dwell: Once the bleeding stops, clean up any blood and distract your cat with a treat or toy. Avoid scolding or making a fuss over the incident, as this can create a negative association.
- Learn for Next Time: Observe your cat’s nails more closely to identify the quick. Trimming in good light is essential.
Trimming All Nails in One Session
It’s not always realistic to trim all four paws plus dewclaws in a single session, especially for a nervous cat.
- Break It Down: Trim two paws one day and the other two the next.
- Focus on One Paw: If your cat is only tolerant of one paw, that’s progress! Celebrate that achievement.
- Consistency is Key: Regular, short, positive sessions are more effective than infrequent, stressful marathon sessions.
The Long-Term Benefits of Good Cat Handling
Mastering techniques like wrapping your cat for nail trimming not only makes this specific task easier but also builds a stronger bond between you and your pet. Good cat handling can extend to all aspects of cat grooming, veterinary visits, and general well-being. By prioritizing cat calming and using positive reinforcement cat methods, you are teaching your cat that these interactions can be manageable and even pleasant. Desensitizing cats to touch and restraint early on sets them up for a lifetime of better health and less stress.
Frequently Asked Questions About Wrapping Cats for Nail Trimming
Q1: How tight should I wrap my cat in the towel?
A1: The towel should be snug enough to prevent the cat from wriggling out or extending its limbs freely, but not so tight that it restricts breathing or causes discomfort. It should feel like a secure hug.
Q2: My cat panics when I try to wrap them. What else can I do?
A2: If wrapping causes extreme panic, it might mean your cat isn’t ready for this level of restraint. Focus more on desensitizing cats to touch and gradually introducing the towel without wrapping. Alternatively, try the lap wrap or scruff-and-support method, or consult a professional groomer.
Q3: How often should I trim my cat’s nails?
A3: Most cats benefit from nail trims every 2-4 weeks. However, this can vary depending on the cat’s age, activity level, and how quickly their nails grow. Observe your cat’s nails for signs of overgrowth.
Q4: Can I use a baby blanket instead of a towel?
A4: Yes, a soft, flexible baby blanket can work, especially for kittens or smaller cats. The key is the material’s ability to create a secure but comfortable wrap.
Q5: What if my cat has very dark nails and I can’t see the quick?
A5: This is common. In this case, it’s safest to trim very small slivers off the end of each nail. Trim only the sharp tip, and if you see a small dark dot in the center of the cut surface, stop. This dot is the beginning of the quick.
Q6: Is a cat muzzle or cat bib ever necessary for nail trimming?
A6: A cat muzzle or cat bib is rarely necessary for routine nail trimming for most cats. They are typically used in situations where a cat is at high risk of biting or causing self-harm due to extreme stress during necessary procedures. If you consider using one, it must be introduced very gradually with positive reinforcement cat methods, and never forced. For most cats, effective cat handling and desensitizing cats to paw handling are sufficient.
Mastering the art of wrapping your cat for nail trimming is a skill that can make a significant difference in your cat’s life and your own. With patience, positive reinforcement, and the right techniques, even the most resistant feline can become more cooperative. Remember, every cat is an individual, so adapt these methods to suit your pet’s unique personality and needs.