
Can you make a cat shelter from common household materials? Yes, you absolutely can! Making a cat shelter is a rewarding way to help stray and feral cats find safe refuge from the elements. This comprehensive guide will walk you through the steps of creating a functional and comfortable DIY cat shelter, ensuring warmth and protection for your feline friends. We’ll cover everything from cat shelter design to essential materials, making building a cat shelter an achievable project for anyone.
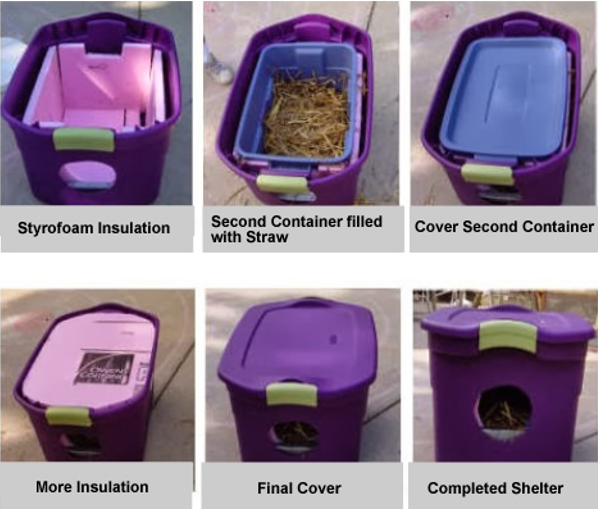
Image Source: alleycatadvocates.org
Why Build a Cat Shelter?
Stray and feral cats often face harsh conditions. They endure extreme temperatures, heavy rain, snow, and the constant threat of predators. A well-built outdoor cat house provides them with a dry, warm, and secure place to rest, escape danger, and feel safe. This simple act of kindness can significantly improve their quality of life and even their chances of survival. Providing a feral cat shelter is a compassionate way to support these vulnerable animals in your community.
Planning Your Cat Shelter: Key Considerations
Before you start making a cat shelter, thoughtful planning is crucial. The goal is to create a simple cat shelter that is both effective and durable.
Shelter Size
A general rule of thumb for an outdoor cat house is to make it just large enough for one or two cats to curl up comfortably. Overly large shelters can lose heat more quickly, making them less effective in cold weather. A good internal dimension might be around 18 inches wide by 24 inches deep by 12 inches high. This provides enough space for a cat to turn around but keeps it cozy.
Entrance and Exit
- Size: The opening should be large enough for a cat to pass through easily but small enough to keep larger predators or unwanted guests out. A common size is about 6 inches by 8 inches.
- Placement: Consider having two openings – one for entry and one for a quick escape. This gives the cat a sense of security. Placing the entrance off-center, rather than directly in the middle of a wall, also helps create a protected nook within the shelter.
Insulation and Ventilation
- Insulation: This is vital for keeping the shelter warm in winter and cooler in summer. Materials like Styrofoam or thick cardboard can be used.
- Ventilation: While it might seem counterintuitive in cold weather, some ventilation is necessary to prevent moisture buildup from the cat’s breath and body heat, which can lead to condensation and a damp, unhealthy environment. Small vents near the top of the shelter, perhaps covered with wire mesh to keep pests out, are ideal.
Drainage
The shelter must be kept dry. Elevating the shelter off the ground and ensuring the roof has a slope will help water run off and prevent dampness.
Durability and Weather Resistance
Your weather-proof cat shelter needs to withstand the elements. Using sturdy materials and sealing joints properly will ensure it lasts longer and provides reliable protection.
Materials You’ll Need for Your DIY Cat Shelter
You can create an effective DIY cat shelter using readily available and affordable materials. Here are some common options:
- Container: A large plastic storage bin (like an opaque Rubbermaid or Sterilite bin) is an excellent base for a simple cat shelter. Opaque bins are better as they block light, making the cats feel more secure.
- Insulation:
- Styrofoam sheets (packaging foam or insulation boards)
- Bubble wrap (heavy-duty packaging type)
- Cardboard (corrugated is best for layering)
- Fasteners & Sealants:
- Duct tape (heavy-duty, weather-resistant)
- Silicone sealant or caulk
- Zip ties or sturdy packing tape
- Tools:
- Box cutter or utility knife
- Measuring tape
- Marker
- Drill (optional, for vent holes)
- Sandpaper (optional, for smoothing edges)
Building Your Simple Cat Shelter: Step-by-Step Guide
Let’s get down to the practical steps of building a cat shelter. This guide focuses on using a plastic storage bin as the primary structure for a weather-proof cat shelter.
Step 1: Prepare Your Container
Choose a sturdy plastic storage bin with a lid. An opaque, darker color is preferable. Ensure it’s clean and dry.
Step 2: Create the Entrance and Exit
- Decide where you want your entrance. It’s best to have it on one of the shorter sides.
- Measure and mark an opening roughly 6 inches wide and 8 inches high. You can draw a simple rectangle or an arched doorway.
- Using a utility knife or box cutter, carefully cut out the opening. Be patient and make multiple passes if necessary to get a clean cut.
- Important: Smooth any rough edges with sandpaper or by gently melting them with a lighter (use extreme caution and do this in a well-ventilated area if you choose this method). Sharp edges can injure a cat.
- If you are creating a second escape route, repeat this process on another side of the bin.
Step 3: Insulate the Shelter
This is a critical step for making an insulated cat shelter.
Option 1: Styrofoam Insulation
- Measure the inside walls and floor of your bin.
- Cut pieces of Styrofoam to fit snugly against the inside walls, floor, and lid. You may need to notch pieces to fit around any internal structural elements of the bin.
- Insert the Styrofoam pieces into the bin. They should fit tightly. If there are small gaps, you can fill them with small pieces of foam or packing peanuts (ensure they are not loose and can’t be ingested).
- For the lid, cut Styrofoam to fit inside the lid.
Option 2: Cardboard Insulation (for less extreme climates or as an additional layer)
- Cut pieces of sturdy corrugated cardboard to fit the inside of the bin.
- Layer several pieces of cardboard together to create an insulating barrier.
- Secure the cardboard layers with duct tape or packing tape.
- Place these cardboard panels inside the bin against the walls and floor.
Option 3: Bubble Wrap Insulation
- Wrap the inside walls and floor of the bin with several layers of heavy-duty bubble wrap.
- Secure the bubble wrap in place using duct tape. Ensure there are no loose pieces that the cats could chew on.
Tip for a Super Insulated Cat Shelter: Combine methods! Use Styrofoam for the primary insulation and then add a layer of bubble wrap or layered cardboard for extra warmth.
Step 4: Add Bedding
Comfortable bedding is essential.
- Materials: Straw is the best option for bedding. It repels moisture and stays relatively warm even when damp. Avoid hay, as it can mold and is less insulating. Old towels or blankets can be used, but they tend to absorb moisture and can freeze, making them less suitable for very cold climates.
- Placement: Fill the bottom of the shelter with a generous amount of straw, creating a cozy nest for the cats. Don’t overstuff it, as the cat needs space to move.
Step 5: Secure the Lid
- Place the lid securely onto the bin.
- Use heavy-duty duct tape or zip ties to firmly attach the lid to the bin. This prevents it from blowing off in the wind and helps keep out rain and snow. Ensure there are no gaps where water can enter.
Step 6: Ventilation (Optional but Recommended)
- If your bin doesn’t have ventilation holes, you can create a couple of small ones near the top of the sides, just below the lid.
- Use a drill to make small holes (about 1/2 inch in diameter).
- Cover these holes with wire mesh or screen secured with tape or sealant. This allows for air circulation while preventing insects or rodents from entering.
Step 7: Elevate the Shelter
To prevent the shelter from sitting in puddles and to keep it warmer, it’s crucial to elevate it.
- Place the shelter on bricks, cinder blocks, or a sturdy pallet.
- Ensure the shelter is stable and won’t tip over.
Advanced Cat Shelter Design: A Sturdier Outdoor Cat House
While the plastic bin is a fantastic and simple option, you might want to consider building a more permanent outdoor cat house from wood. This requires a bit more skill and tools but results in a very durable and attractive shelter.
Materials for a Wooden Cat Shelter
- Wood: Untreated plywood (exterior grade, at least 1/2 inch thick) is a good choice. Avoid treated lumber as the chemicals can be harmful to cats.
- Fasteners: Exterior-grade screws, nails.
- Sealant: Non-toxic, waterproof sealant or exterior paint.
- Insulation: Rigid foam insulation board (like XPS or EPS), fiberglass insulation (ensure it’s properly sealed so cats can’t access it).
- Roofing Material: Shingles, a piece of linoleum, or a sturdy plastic sheet to cover the roof for added weather protection.
- Tools: Saw, drill, screws, measuring tape, pencil, sandpaper, caulk gun.
Building a Wooden Cat Shelter: Basic Construction
- Design: Sketch out a simple box design with a sloped roof. The dimensions can be similar to the plastic bin shelter (e.g., 18x24x12 inches internally).
- Cut Wood: Cut your plywood into pieces for the floor, four walls, and roof. Remember to account for the thickness of the wood when cutting.
- Assemble Walls: Screw or nail the walls together to form a box. Ensure corners are square.
- Create Entrance: Cut an entrance hole (6×8 inches) in one of the front walls, positioned off-center.
- Attach Floor: Attach the floor to the bottom of the walls. It’s best to have the floor slightly recessed or have a lip to prevent water from seeping in.
- Insulate:
- Cut rigid foam insulation to fit the interior walls, floor, and ceiling.
- Secure the insulation with adhesive or small screws.
- Cover the insulation with a thin layer of plywood or heavy-duty fabric (like canvas) to prevent the cats from chewing on it.
- Roof:
- Create a sloped roof so water runs off. You can make a single slope or a pitched roof.
- Attach the roof securely.
- Add an overhang to protect the entrance from rain.
- Cover the roof with a weather-resistant material like shingles or a plastic sheet for maximum protection.
- Seal and Paint: Seal all joints and seams with silicone caulk. Once dry, paint or seal the exterior with a non-toxic, pet-safe product to protect the wood from the elements.
- Ventilation: Drill small ventilation holes near the top of the side walls, covered with mesh.
- Elevate: Place the wooden shelter on bricks or blocks.
Cardboard Cat Shelter: A Temporary Solution
A cardboard cat shelter can be a good temporary option, especially if you’re on a tight budget or need to create a shelter quickly. While not as durable as plastic or wood, it can still offer protection.
Materials for a Cardboard Cat Shelter
- Large, sturdy cardboard boxes (appliance boxes are ideal)
- Duct tape
- Box cutter or utility knife
- Plastic sheeting or tarp (optional, for waterproofing)
- Straw for bedding
Building a Cardboard Cat Shelter
- Choose Boxes: Select a large, sturdy box. You might need two boxes – one to nest inside another for extra insulation.
- Cut Openings: Cut an entrance hole (6×8 inches) in one side of the box. If using two boxes, cut the opening in both.
- Insulate (Optional but Recommended):
- If using two boxes, place one inside the other, leaving a small gap between them. You can fill this gap with crumpled newspaper or more cardboard pieces.
- Line the inside of the box with extra layers of cardboard or foam packaging.
- Waterproof (Crucial for Cardboard):
- Cover the outside of the box thoroughly with duct tape, paying close attention to seams and corners.
- If possible, cover the entire exterior with a plastic sheet or tarp, securing it tightly with tape. This is essential to protect the cardboard from rain and snow.
- Elevate: Place the cardboard shelter on bricks or blocks.
- Add Bedding: Fill the bottom with straw.
A cardboard cat shelter is best suited for dry climates or as a temporary solution during milder weather.
Placement of Your Cat Shelter
Where you place the shelter is as important as how you build it.
- Quiet and Safe Location: Choose a spot that is out of direct wind and traffic. Under a porch, in a sheltered corner of a yard, or near bushes can offer additional protection.
- Elevated: As mentioned, always elevate the shelter to keep it dry and warmer.
- Consider the Cats’ Habits: Observe where stray cats in your area tend to congregate. Placing the shelter nearby might encourage them to use it.
- Avoid Busy Areas: Keep shelters away from loud noises, constant human activity, or areas where dogs might frequent.
Maintenance of Your Cat Shelter
Even the best-built shelter needs occasional maintenance.
- Check Regularly: Inspect the shelter weekly or bi-weekly, especially after bad weather.
- Cleanliness: Remove any old bedding, waste, or debris. Replace soiled straw with fresh material.
- Repairs: Check for damage to the structure, insulation, or waterproofing. Make necessary repairs promptly.
- Winter Check: In winter, ensure the entrance isn’t blocked by snow or ice.
Frequently Asked Questions (FAQ)
Q1: What is the best material for a cat shelter?
The best material depends on your climate and resources. For durability and insulation, wood is excellent. For ease of construction and affordability, a plastic storage bin is a great choice. Cardboard can be used for temporary shelters, but it requires significant waterproofing.
Q2: Can I use a Styrofoam cooler as a cat shelter?
Yes, a Styrofoam cooler can be a very effective simple cat shelter, especially for one cat. They are naturally insulated and lightweight. Ensure the cooler is clean, opaque or covered to block light, and that you cut a suitable entrance and exit.
Q3: How do I make sure the shelter stays warm in winter?
Proper insulation is key. Use materials like Styrofoam or rigid foam boards for the walls, floor, and lid. Adding a generous amount of straw bedding is crucial, as it insulates and wicks away moisture. Elevating the shelter also helps.
Q4: Should I put food and water inside the shelter?
It’s generally not recommended to put food and water directly inside the shelter itself, as this can attract pests and increase the risk of mold and bacteria. If you wish to feed the cats, place food and water bowls a short distance away from the shelter in a protected area.
Q5: How big should the entrance hole be?
An entrance hole around 6 inches wide by 8 inches high is ideal. This is large enough for an adult cat to pass through easily but small enough to deter larger predators and keep heat in.
Q6: How do I prevent moisture buildup inside the shelter?
Ensure good ventilation with small, covered vent holes near the top of the shelter. Using straw for bedding is also important, as it breathes better and repels moisture compared to fabric. Elevating the shelter also helps prevent ground moisture from affecting it.
Q7: Do I need to secure the shelter to the ground?
It’s not strictly necessary, but ensuring the shelter is stable is important. Placing it on a level surface and using bricks or blocks to elevate it will provide stability. If you live in a very windy area, you might consider anchoring it lightly.
Q8: What kind of bedding is best for a cat shelter?
Straw is the best bedding material. It provides excellent insulation, repels moisture, and stays warm even when damp. Avoid hay, as it can mold and become a health hazard. Old blankets or towels can be used in milder weather, but they absorb moisture and can freeze, making them less suitable for cold climates.
Q9: How often should I clean the cat shelter?
Regular checks are important, especially after harsh weather. Clean out old bedding and waste, and replace the straw with fresh material about once a month, or more often if it becomes soiled or damp.
Q10: Can I make a cat shelter out of a washing machine drum?
While creative, a washing machine drum is generally not ideal for a cat shelter. It offers very little insulation, is difficult to make weather-proof, and the open design makes it hard to keep warm and dry. Plastic bins, wood, or even well-constructed cardboard boxes are much better options.
By following these steps and considerations, you can confidently create a safe and welcoming haven for stray cats in your neighborhood. Your DIY cat shelter will be a testament to your compassion and a vital resource for these resilient creatures.