
Can you fix cat scratches on a leather chair? Yes, you absolutely can repair cat scratches on a leather chair, and this guide will show you how with simple steps. Fixing these unwelcome marks is achievable, whether the damage is light or a bit deeper. We’ll explore different methods and products to bring your beloved leather furniture back to its former glory. This isn’t just about making it look good; it’s about preserving your furniture and saving you money on costly replacements or professional repairs.
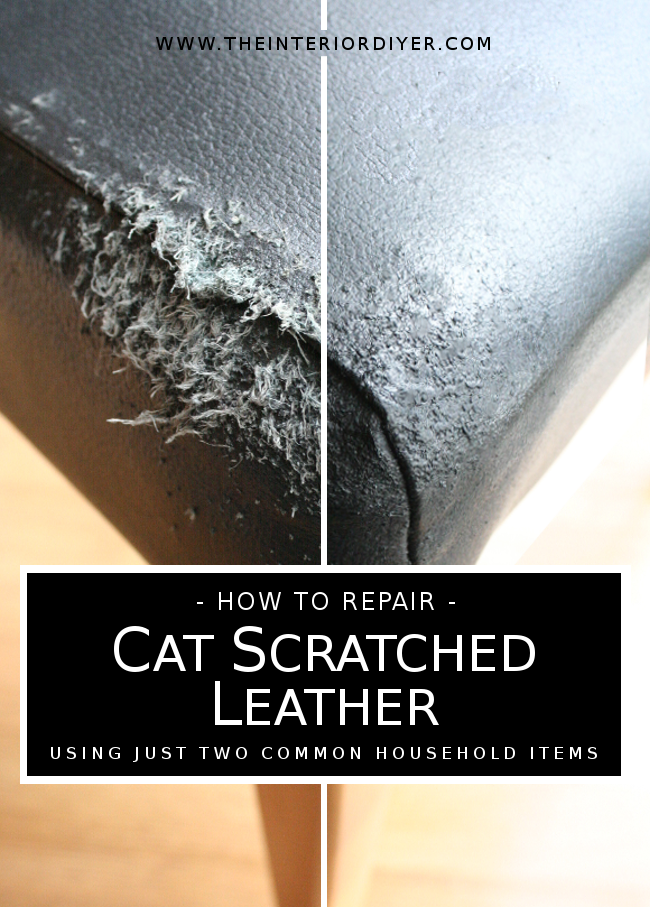
Image Source: 44.201.78.168
Why Do Cats Scratch Leather?
Cats scratch for many reasons. It’s a natural and important behavior for them.
- Marking Territory: Cats have scent glands in their paws. Scratching helps them leave their scent and visual marks. This tells other cats, “This is my spot!”
- Claw Maintenance: Scratching helps cats shed the outer husks of their claws. This keeps their claws sharp and healthy.
- Stretching and Exercise: It’s a full-body workout for them! Scratching allows them to stretch their muscles, especially in their back and shoulders.
- Stress Relief and Excitement: Sometimes, cats scratch when they’re feeling playful, excited, or even stressed. It can be an outlet for their energy.
Knowing why they scratch can help you redirect their behavior to appropriate scratching posts, saving your furniture from future damage.
Assessing the Damage: Light Scratches vs. Deep Scratches
Before you grab any supplies, take a good look at the damage. This will help you choose the right repair method.
Light Scratches (Surface Level)
These are the most common. You’ll see faint lines on the surface of the leather. They haven’t gone deep into the material.
- Appearance: Thin, surface-level marks that don’t go through the color coat.
- Feel: You might feel a slight difference in texture, but the leather is still intact.
Deep Scratches (Penetrating Damage)
These scratches go deeper, often through the color coat and even into the leather itself.
- Appearance: Visible gouges, white or lighter colored lines where the top layer has been removed, or even small tears in the leather.
- Feel: You can clearly feel the damage with your finger. The edges might be raised or rough.
Gathering Your Repair Supplies
Having the right tools makes the job much easier. Here’s a list of common items you might need. A good leather repair kit often contains many of these.
- Leather Cleaner: To prepare the area.
- Soft Cloths: For cleaning, applying products, and buffing.
- Leather Conditioner: Essential for keeping the leather supple.
- Rubbing Alcohol (Isopropyl Alcohol): For cleaning stubborn marks.
- Fine-Grit Sandpaper (e.g., 600-1200 grit): For smoothing edges of deeper scratches.
- Leather Filler or Bonding Agent: For filling deeper gouges.
- Leather Dye or Colorant: To match the original color.
- Small Applicator Tools: Like spatulas, cotton swabs, or toothpicks.
- Gloves: To protect your hands.
- Optional: Hair dryer (on low heat), sealant or finish.
Simple Steps for Fixing Light Cat Scratches
These methods are great for those surface-level marks that haven’t deeply damaged the leather.
Method 1: Using Leather Conditioner
Sometimes, a good quality leather conditioner is all you need. It can help moisturize the leather and make minor scratches less visible.
- Clean the Area: Gently wipe the scratched area with a damp cloth to remove any dust or dirt. Let it dry completely.
- Apply Conditioner: Put a small amount of leather conditioner onto a clean, soft cloth.
- Rub Gently: Rub the conditioner into the scratched area using a circular motion. Focus on the scratch itself.
- Buff: Allow the conditioner to soak in for a few minutes. Then, gently buff the area with another clean, dry cloth.
- Repeat if Needed: For very light scratches, one application might be enough. You can repeat this process a few times to see if it improves the appearance.
This method helps to blend the scratch by rehydrating the leather fibers. It’s a gentle approach that’s also great for general conditioning leather care.
Method 2: The Gentle Heat Treatment
For very light surface scratches, a bit of gentle heat can sometimes help. This works by softening the leather’s finish, allowing it to smooth over.
- Clean the Scratch: Make sure the scratched area is clean and dry.
- Apply Leather Conditioner: Apply a small amount of leather conditioner to the scratch and the surrounding area.
- Use a Hair Dryer: Hold a hair dryer on a low heat setting about 6-8 inches away from the leather. Move the dryer constantly to avoid overheating one spot.
- Work the Heat: Gently rub the area with your finger or a soft cloth as you apply the heat. The warmth and friction can help the leather fibers relax and the scratch to fade.
- Buff and Cool: Once you feel the scratch is less visible, turn off the dryer. Let the leather cool down completely. Then, buff with a clean cloth.
Important Note: Always use the lowest heat setting and keep the dryer moving. Too much heat can damage or dry out the leather.
Tackling Deeper Scratches: A Step-by-Step Approach
When scratches are more significant, you’ll need more robust tools, like a leather repair kit or specific cat scratch remover products.
Step 1: Clean the Damaged Area Thoroughly
Good preparation is key to a successful repair.
- Use a Leather Cleaner: Apply a specialized leather cleaner to a soft cloth. Gently wipe the scratched area and the surrounding leather. This removes dirt, oils, and any residue that could interfere with the repair.
- Wipe with Alcohol (Optional): For stubborn marks or if the scratch is particularly greasy, you can lightly dab the area with a cotton ball or swab dipped in rubbing alcohol. Be very gentle and test on an inconspicuous area first. This helps to degrease the surface.
- Dry Completely: Ensure the area is completely dry before moving to the next step.
Step 2: Smooth the Edges of the Scratch
If the scratch has created rough edges or lifted the leather, you’ll need to smooth them down.
- Gentle Sanding: Take fine-grit sandpaper (around 600-1200 grit). Very lightly sand along the length of the scratch. The goal is to make the edges flush with the rest of the leather, not to remove large amounts of material.
- Wipe Away Dust: Use a clean, dry cloth to gently wipe away any dust created by the sanding.
Step 3: Apply Leather Filler (If Necessary)
For deeper gouges that have removed material, you’ll need leather filler. This product acts like a putty to fill the void.
- Choose the Right Filler: Ensure your leather filler is suitable for your type of leather. Some fillers are flexible, while others can become brittle.
- Apply with a Spatula: Use a small spatula, putty knife, or even a stiff card. Scoop a small amount of leather filler onto the tool.
- Fill the Scratch: Carefully press the filler into the scratch. Work it in to fill the entire depth. Try to make the surface of the filler as smooth and level with the surrounding leather as possible.
- Level and Smooth: Use the edge of your spatula to scrape away any excess filler, leaving it flush with the leather surface.
- Allow to Dry: Let the leather filler dry completely according to the product’s instructions. This can take anywhere from a few minutes to several hours. Some kits may suggest using a hairdryer on a low setting to speed up drying.
Step 4: Color Matching and Dye Application
This is where you restore the appearance of the leather.
- Color Matching: This is a crucial step. If your leather repair kit includes a colorant, it might have a mixing guide. If you’re buying leather dye separately, try to get a shade that perfectly matches your chair. Test the color on a hidden area of the chair first.
- Apply the Dye: Using a fine brush, cotton swab, or the applicator provided with your leather repair kit, carefully apply the leather dye over the filled area. Build up the color in thin layers.
- Feather the Edges: As you apply the dye, gently feather the edges into the surrounding leather. This helps the repair blend in seamlessly. Avoid harsh lines.
- Drying Between Layers: Allow each thin layer of dye to dry completely before applying the next. This prevents the color from looking blotchy or uneven.
- Repeat for Coverage: Continue applying thin layers until the color matches the surrounding leather.
Step 5: Sealing and Conditioning
Once the dye is dry, you need to protect your repair and the rest of the chair.
- Apply a Sealer (Optional but Recommended): Some repair kits include a leather sealer or finish. Apply a thin, even coat over the repaired area to protect the dye. Allow it to dry completely.
- Apply Leather Conditioner: This is a vital step for furniture restoration. Apply a generous amount of good quality leather conditioner to the entire chair, or at least the repaired section and surrounding panels. This will nourish the leather, make the repaired area less noticeable, and prevent future cracking.
- Buff: Buff the chair with a clean, soft cloth after applying the conditioner.
Alternative Repair Methods and Products
Sometimes, you might need to consider other options, especially for larger or more complex damage.
Using a Leather Patch
For significant tears or holes, a leather patch can be an effective solution. This is often considered an upholstery repair technique.
- Type of Patch: You can find self-adhesive patches or patches that require a special leather adhesive. Choose a patch that matches the color and texture of your chair as closely as possible.
- Preparation: Clean the area around the damage thoroughly. If using a patch that requires adhesive, apply it according to the product instructions.
- Application: Carefully position the patch over the damaged area. Press down firmly, ensuring good adhesion. If it’s not self-adhesive, you might need to apply adhesive to the back of the patch or directly to the leather.
- Finishing: For a more seamless look, you can sometimes use leather dye to color the patch to match your chair, especially if the patch is a different color.
Using Specialized Cat Scratch Remover Products
There are products specifically designed as a cat scratch remover for leather. These often combine cleaning, conditioning, and sometimes even subtle filling or color-restoring agents.
- Follow Instructions: Always follow the manufacturer’s instructions precisely.
- Test First: Before applying to a visible area, test the product on an inconspicuous spot to ensure it doesn’t discolor or damage your leather.
- Application: Typically, these are applied with a cloth and then buffed. Some might require a light application of heat.
Maintaining Your Leather Furniture After Repair
Prevention and regular care are key to keeping your leather furniture looking its best.
Regular Cleaning
- Dust Regularly: Use a soft, dry cloth to dust your leather furniture weekly.
- Spot Clean Spills Immediately: Blot spills with a clean, dry cloth. Avoid rubbing.
Conditioning Leather
- Apply Leather Conditioner: Aim to condition your leather furniture every 6-12 months, or more often if you live in a dry climate or the leather appears dry. This keeps it supple and prevents cracking, which can make it more susceptible to scratches.
- Choose the Right Conditioner: Use a high-quality leather conditioner specifically designed for furniture. Avoid products with silicone or petroleum distillates, as they can damage leather over time.
Protecting Against Future Scratches
- Provide Scratching Posts: Ensure your cats have plenty of attractive scratching posts and toys. Place them in prominent areas where your cats like to hang out.
- Feline Deterrents: Consider using deterrent sprays or sticky tape designed to discourage cats from scratching furniture.
- Trimming Claws: Regularly trimming your cat’s claws can significantly reduce the damage they can inflict.
Common Mistakes to Avoid
Even with the best intentions, some errors can happen during the repair process.
- Using Too Much Product: Over-applying cleaner, filler, or dye can lead to uneven results or damage. Always use thin, even coats.
- Not Testing Colors: Applying dye or filler without testing the color match first can result in a mismatched repair that is more noticeable than the original scratch.
- Aggressive Sanding: Sanding too harshly can remove too much leather and create a larger problem. Be gentle and use fine-grit sandpaper.
- Skipping the Conditioning Step: Leather needs moisture to stay healthy. Failing to condition after a repair can lead to the repaired area drying out and cracking.
- Using Harsh Chemicals: Avoid using household cleaners, ammonia, or bleach on leather, as they can strip the natural oils and cause irreversible damage.
When to Call a Professional
While DIY repairs can be very effective, there are times when professional help is the best option.
- Extensive Damage: If your chair has numerous deep scratches, tears, or the damage covers a large area, a professional upholstery repair specialist might be needed.
- Valuable or Antique Furniture: For expensive, antique, or designer leather pieces, it’s often safer to entrust the repair to an expert who specializes in furniture restoration.
- Delicate Leather Types: Some leathers, like aniline or semi-aniline, are more sensitive and require specialized knowledge for repair.
- Uncertainty: If you’re not confident in your ability to achieve a good result, a professional can ensure the repair is done correctly and seamlessly.
Frequently Asked Questions (FAQ)
Q: Can I really fix deep cat scratches on my leather chair myself?
A: Yes, for many types of deep scratches, you can effectively repair them yourself using a leather repair kit, leather filler, and leather dye. It requires patience and careful application.
Q: What is the best product for removing cat scratches from leather?
A: The best product depends on the severity of the scratch. For light scratches, leather conditioner might suffice. For deeper scratches, a leather repair kit containing leather filler and matching leather dye is often the most effective solution. Specialized cat scratch remover products can also be helpful.
Q: How do I match the color of the leather dye to my chair?
A: Color matching is crucial. Many leather repair kits come with a color matching system or a range of shades to mix. If buying separately, take a sample of the leather (if possible) or a clear photo in natural light to a specialist supplier. Always test the mixed color on an inconspicuous area first.
Q: Will using a leather patch work for cat scratches?
A: A leather patch can be a good solution for larger tears or gouges where filling might not be sufficient. It’s a form of upholstery repair that can be effective if the patch is applied neatly and, ideally, color-matched.
Q: How often should I use leather conditioner on my chair?
A: It’s generally recommended to use leather conditioner every 6 to 12 months. If your leather feels dry or stiff, or if it’s in a very sunny or dry environment, you might need to condition it more frequently. This is an important part of conditioning leather and furniture restoration.
Q: Is it safe to use rubbing alcohol on leather for cleaning scratches?
A: Rubbing alcohol can be used sparingly and very gently to clean greasy marks from leather, especially before a repair. However, it can dry out the leather. Always dilute it slightly, test on a hidden spot first, and follow up with leather conditioner immediately after.
By following these steps and using the right products, you can successfully repair cat scratches on your leather chair and keep your furniture looking beautiful for years to come. Remember, patience and attention to detail are your best allies in any furniture restoration project.